So my adorable little niece (2 and a half) is in daycare at a church. Instead of having a Halloween party, they are throwing a Noah's Ark party.
Whatever.
So, my sister asked me to make her one of the dinosaur hats I've made in the past for the sweet kiddo. She wanted a girlie dinosaur hat instead of a "boy" one, lol, so here it is.
Dinosaur hat:
To make the actual hat, I once again used this earflap hat pattern from Micah Makes. http://www.micahmakes.com/blog/free-pattern-versatile-earflap-hat-pattern (sorry, blogger isn't really working with me right now, so I can't imbed the link. My bad, folks).
So, make the basic hat (I used the toddler size). I always add a couple of extra rows because I think the actual pattern is a little short.
Stop before you add the earflaps.
My niece is almost 3 feet tall, and I wanted the hat to be pretty long on her. So, I made the long part in the back with dc instead of the hdc that is used throughout the rest of the pattern.
When you finish the final round, ch 2 then dc 35 around. Then we start the gradual decrease. You don't want it to dec too quickly because it will kill the length, so here is the dec pattern:
Row 1: ch 2, DC in next st and in next 34 across.
Row 2: ch 2, dc2tog then dc across.
Row 3: ch 2, DC across
Row 4: ch 2, DC across, for last two sts, dc2tog
Row 5: ch 2, DC across
Repeat.
If you're going it right, then each dec should be on the opposite side as the other dec, keeping the dec even throughout.
When it gets to about 8 sts across, do 2 rows of just DC across.
Last row: sc2tog, hdc, DC picot DC, hdc, sc2tog.
SC around entire piece to create a border, working 3 into each corner. Tie off and you're done with the basic hat and tail.
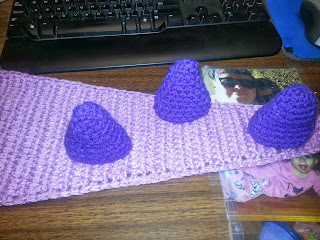
Next we're going to add the spikes, which make it an awesome dinosaur hat instead of just a weird beanie with a tail. At first I wanted to make all the spikes purple, but then I ran out of dark purple, so I decided to do half of them in pink. So, in this first pic, that's why all the spikes are purple.
To make a spike use this pattern that I found from: http://www.theboytrifecta.com/2011/01/dino-spike-crochet-pattern.html
She works in the round, which I don't. I prefer to work in rows. Your choice, either way.
Round 1: Make a magic loop/ring, and do 6 single crochets in the loop. Pull tight. (6 sc)
Round 2: Single crochet around (6 sc)
Round 3: 2 single crochet in first stitch, 1 sc in next stitch - repeat around (9 sc)
Round 4: Single crochet in each stitch (9 sc)
Round 5: 2 single crochet in first stitch, 1 sc in next stitch - repeat around (14 sc)
Round 6: Single crochet around (14 sc)
Round 7: Single crochet around (14 sc)
Round 8: Single crochet in 1st and 2nd stitches, 2 single crochet in third - repeat around (18 sc)
Round 9: Single crochet around (18 sc)
Round 10: Single crochet around (18 sc)
Round 11: Single crochet around (18 sc)
Fasten off and leave a tail to sew spikes to hat (I wrapped the yarn around the base of the spike about 3 times and that was the amount I needed).
It took about 10 spikes to get the job done. The two closest to the face I made smaller by leaving off some of the last rows.
And there you have it!
I'll try to post pictures of little miss wearing it so you can get a better sense of what it is supposed to look like.


