Monday, January 6, 2014

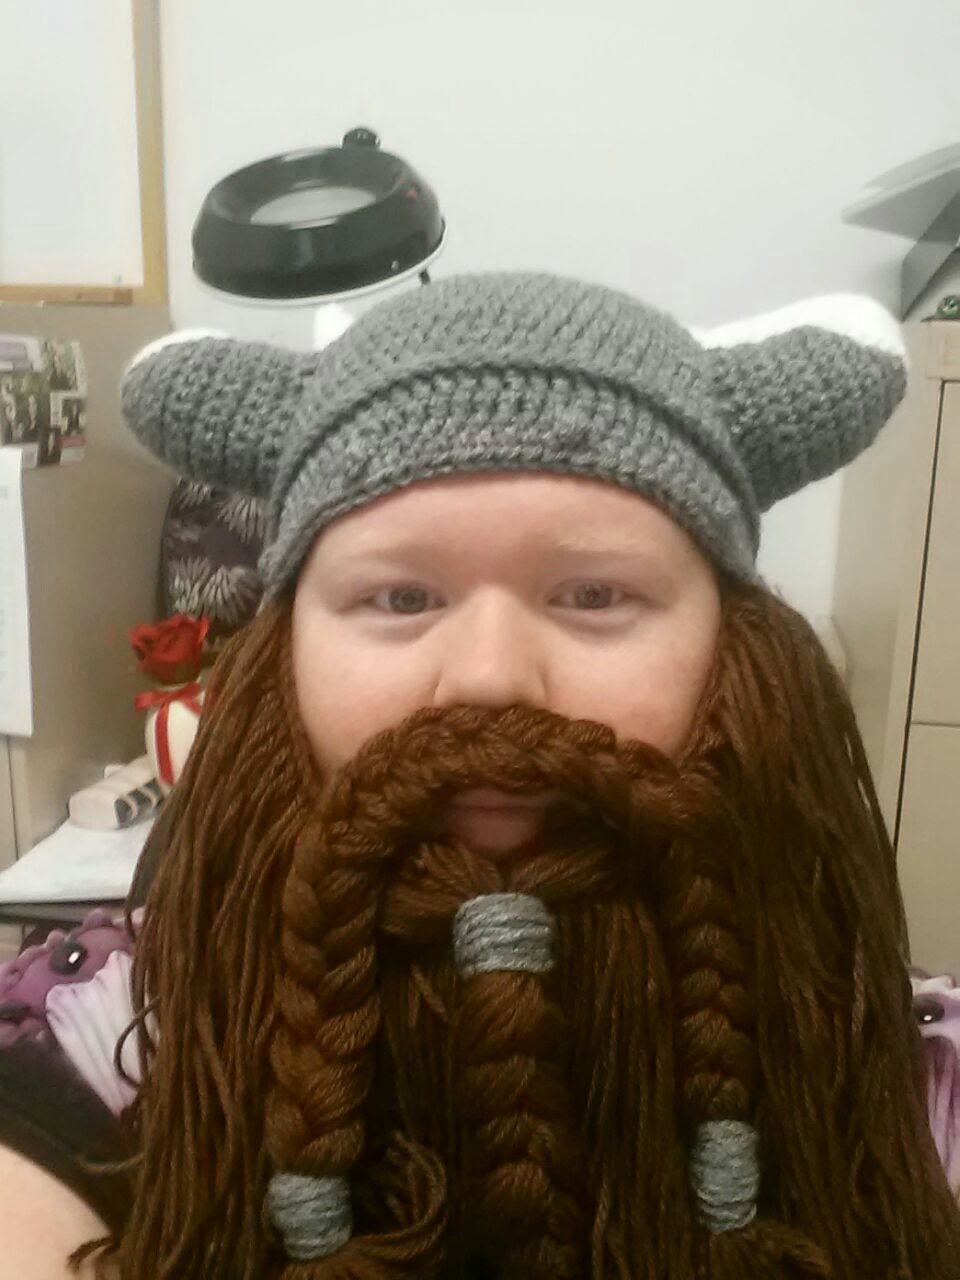
Viking Helm with Beard! *updated*

And so begins the long string of long promised post-Christmas crafts!


I had a ton of fun with this one. It was originally intended to be a gift for my other brother-in-law, but I decided I wanted to keep it and gave him a bottle of liquor instead.
I used this pattern (http://www.craftown.com/Viking-Beard-Hat.html) with the only modification being in the styling of the beard. I liked the idea of doing the lord of the rings style dwarven beard instead. (and obviously I had to add some length because of my giant sized head…but that should be a given at this point).
I wore it to my family’s new years eve get together, and everyone loved it! They all insisted on trying it on (even though it was huge on everyone- including my dad, lol) and we had a lot of fun wearing it around the house and scaring my 3 year old niece. We’re not nice people, haha.


To follow up, my brother in law was insanely jealous and begged me to make one for him, too. So, here it is. 

The beard is a little long on his face (part of the beard is supposed to be a 'stache) and I still need to fix it. But otherwise I think it looks great, and I love the mix of colors!

Tuesday, December 17, 2013

Christmas Hat!


Happy Holidays!
Well, everyone at work is making fun of me right now, lol. This time of year everyone I know is buying those cute little santa hats, including most of my friends at work. They asked why I don’t get one, and I answered honestly. As I have often mentioned here, I have a big head. So, while they are adorable, those cute santa hats always dig into my head and leave deep lines in my forehead.
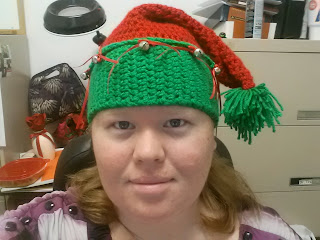
Never one to be deterred, I decided I was crafty enough to make my own. And you know what? I think it came out pretty cute.
I used a pattern I found on pinterest (link found here: http://www.favecrafts.com/Crochet-Hats-Scarves-Gloves/Crochet-Santa-Hat-from-Red-Heart-Yarn/ml/1 ). I followed it exactly for the basic form of the hat. (I even used the Size H 5mm hook).
For reference, on the hat I made, color A is the green and color B is the red.
Instructions:
Brim: With A, ch 11.
Row 1: Sc in 2nd ch from hook and in each ch across, turn – 10 sc.
Row 2: Ch 1, working in back loops only, sc in each ch across.
  Repeat Row 2 until piece measures 18 (20)" from beginning. Fasten off. Sew ends together to form a loop for Brim.

Crown
Round 1: With right side facing, join A with a slip st along one long side of Brim, work sc 60 (66) sts evenly spaced around, slip st to first st to join. Cut A.
Round 2: With B, ch 3 (counts as dc here and throughout), dc in each st around, slip st to top of beginning ch to join.
Rounds 3-6: Repeat Round 2.
Round 7: Ch 3, [dc2tog, dc in next 8 (9) dc] 5 times, dc2tog, dc in next 7 (8) dc, slip st to top of beginning ch to join – 54 (60) sts.
Round 8: Repeat Round 2.
Round 9: Ch 3, [dc in next 4 (5) dc, dc2tog, dc in next 3 dc] 5 times, dc in next 4 (5) dc, dc2tog, dc in next 2 dc, slip st to top of beginning ch to join – 48 (54) sts.
Round 10: Repeat Round 2.
Round 11: Ch 3, [dc2tog, dc in next 6 (7) dc] 5 times, dc2tog, dc in next 5 (6) dc, join, slip st to top of beginning ch to join – 42 (48) sts.
Round 12: Repeat Round 2.
Round 13: Ch 3, [dc in next 3 (4) dc, dc2tog, dc in next 2 dc] 5 times, dc in next 3 (4) dc, dc2tog, dc in next dc, slip st to top of beginning ch to join – 36 (42) sts.
Round 14: Repeat Round 2.
Round 15: Ch 3, [dc2tog, dc in next 4 (5) dc] 5 times, dc2tog, dc in next 3 (4) dc, slip st to top of beginning ch to join – 30 (36) sts.
Round 16: Repeat Round 2.
Round 17: Ch 3, [dc in next 2 (3) dc, dc2tog, dc in next dc] 5 times, dc in next 2 (3) dc, dc2tog, slip st to top of beginning ch to join – 24 (30) sts.
Round 18: Repeat Round 2.
For Size Large Only-Round 19: Ch 3, [dc2tog, dc in next 3 dc] 5 times, dc2tog, dc in next 2 dc, slip st to top of beginning ch to join – 24 sts.
Round 20: Repeat Round 2.
For Both Sizes-Next Round: Ch 3, [dc2tog, dc in next 2 dc] 5 times, dc2tog, dc in next dc, slip st to top of beginning ch to join – 18 sts.
Next Round: Repeat Round 2.
Next Round: Ch 3, [dc2tog, dc in next dc] 5 times, dc2tog, slip st to top of beginning ch to join – 12 sts.
Next Round: Repeat Round 2.
Next Round: Ch 3, [dc2tog] 5 times, dc in next dc, slip st to top of beginning ch to join – 7 sts. Fasten off.

Cut yarn, leaving a long tail. Thread tail through remaining sts and pull to close. Knot to secure.

FINISHING
With B, make pompom. Sew to tip of hat. Weave in ends. 

Read more at http://www.favecrafts.com/Crochet-Hats-Scarves-Gloves/Crochet-Santa-Hat-from-Red-Heart-Yarn/ml/1#HLe2MIgqyEfQGTeE.99
Instructions:
Brim: With A, ch 11.
Row 1: Sc in 2nd ch from hook and in each ch across, turn – 10 sc.
Row 2: Ch 1, working in back loops only, sc in each ch across.
  Repeat Row 2 until piece measures 18 (20)" from beginning. Fasten off. Sew ends together to form a loop for Brim.

Crown
Round 1: With right side facing, join A with a slip st along one long side of Brim, work sc 60 (66) sts evenly spaced around, slip st to first st to join. Cut A.
Round 2: With B, ch 3 (counts as dc here and throughout), dc in each st around, slip st to top of beginning ch to join.
Rounds 3-6: Repeat Round 2.
Round 7: Ch 3, [dc2tog, dc in next 8 (9) dc] 5 times, dc2tog, dc in next 7 (8) dc, slip st to top of beginning ch to join – 54 (60) sts.
Round 8: Repeat Round 2.
Round 9: Ch 3, [dc in next 4 (5) dc, dc2tog, dc in next 3 dc] 5 times, dc in next 4 (5) dc, dc2tog, dc in next 2 dc, slip st to top of beginning ch to join – 48 (54) sts.
Round 10: Repeat Round 2.
Round 11: Ch 3, [dc2tog, dc in next 6 (7) dc] 5 times, dc2tog, dc in next 5 (6) dc, join, slip st to top of beginning ch to join – 42 (48) sts.
Round 12: Repeat Round 2.
Round 13: Ch 3, [dc in next 3 (4) dc, dc2tog, dc in next 2 dc] 5 times, dc in next 3 (4) dc, dc2tog, dc in next dc, slip st to top of beginning ch to join – 36 (42) sts.
Round 14: Repeat Round 2.
Round 15: Ch 3, [dc2tog, dc in next 4 (5) dc] 5 times, dc2tog, dc in next 3 (4) dc, slip st to top of beginning ch to join – 30 (36) sts.
Round 16: Repeat Round 2.
Round 17: Ch 3, [dc in next 2 (3) dc, dc2tog, dc in next dc] 5 times, dc in next 2 (3) dc, dc2tog, slip st to top of beginning ch to join – 24 (30) sts.
Round 18: Repeat Round 2.
For Size Large Only-Round 19: Ch 3, [dc2tog, dc in next 3 dc] 5 times, dc2tog, dc in next 2 dc, slip st to top of beginning ch to join – 24 sts.
Round 20: Repeat Round 2.
For Both Sizes-Next Round: Ch 3, [dc2tog, dc in next 2 dc] 5 times, dc2tog, dc in next dc, slip st to top of beginning ch to join – 18 sts.
Next Round: Repeat Round 2.
Next Round: Ch 3, [dc2tog, dc in next dc] 5 times, dc2tog, slip st to top of beginning ch to join – 12 sts.
Next Round: Repeat Round 2.
Next Round: Ch 3, [dc2tog] 5 times, dc in next dc, slip st to top of beginning ch to join – 7 sts. Fasten off.

Cut yarn, leaving a long tail. Thread tail through remaining sts and pull to close. Knot to secure.

FINISHING
With B, make pompom. Sew to tip of hat. Weave in ends. 


Read more at http://www.favecrafts.com/Crochet-Hats-Scarves-Gloves/Crochet-Santa-Hat-from-Red-Heart-Yarn/ml/1#HLe2MIgqyEfQGTeE.99

Instructions:
Brim: With A, ch 11.
Row 1: Sc in 2nd ch from hook and in each ch across, turn – 10 sc.
Row 2: Ch 1, working in back loops only, sc in each ch across. (Please note that I did HDC here instead of SC. I hated the idea of working 20+ inches of SC. I guess I'm lazy, lol)
  Repeat Row 2 until piece measures 18 (20)" from beginning. Fasten off. Sew ends together to form a loop for Brim.

Crown
Round 1: With right side facing, join A with a slip st along one long side of Brim, work sc 60 (66) sts evenly spaced around, slip st to first st to join. Cut A. Also, I think this step is a touch unclear. Basically, just SC around the entire band, working 3 SC in each corner. Also, if you hate sewing things together like I do, ignore the "sew together" step above, and when you are doing the edging for the SECOND short side, use a joining st (like you're doing attachment crochet) and work the two ends together. IMO, it makes a stronger piece. You know that stitching isn't going to come out unless the entire edging comes off. But that's just me. ONWARD WITH THE PATTERN!
Round 2: With B, ch 3 (counts as dc here and throughout), dc in each st around, slip st to top of beginning ch to join.
Rounds 3-6: Repeat Round 2.
Round 7: Ch 3, [dc2tog, dc in next 8 (9) dc] 5 times, dc2tog, dc in next 7 (8) dc, slip st to top of beginning ch to join – 54 (60) sts.
Round 8: Repeat Round 2.
Round 9: Ch 3, [dc in next 4 (5) dc, dc2tog, dc in next 3 dc] 5 times, dc in next 4 (5) dc, dc2tog, dc in next 2 dc, slip st to top of beginning ch to join – 48 (54) sts.
Round 10: Repeat Round 2.
Round 11: Ch 3, [dc2tog, dc in next 6 (7) dc] 5 times, dc2tog, dc in next 5 (6) dc, join, slip st to top of beginning ch to join – 42 (48) sts.
Round 12: Repeat Round 2.
Round 13: Ch 3, [dc in next 3 (4) dc, dc2tog, dc in next 2 dc] 5 times, dc in next 3 (4) dc, dc2tog, dc in next dc, slip st to top of beginning ch to join – 36 (42) sts.
Round 14: Repeat Round 2.
Round 15: Ch 3, [dc2tog, dc in next 4 (5) dc] 5 times, dc2tog, dc in next 3 (4) dc, slip st to top of beginning ch to join – 30 (36) sts.
Round 16: Repeat Round 2.
Round 17: Ch 3, [dc in next 2 (3) dc, dc2tog, dc in next dc] 5 times, dc in next 2 (3) dc, dc2tog, slip st to top of beginning ch to join – 24 (30) sts.
Round 18: Repeat Round 2.
For Size Large Only-Round 19: Ch 3, [dc2tog, dc in next 3 dc] 5 times, dc2tog, dc in next 2 dc, slip st to top of beginning ch to join – 24 sts.
Round 20: Repeat Round 2.
For Both Sizes-Next Round: Ch 3, [dc2tog, dc in next 2 dc] 5 times, dc2tog, dc in next dc, slip st to top of beginning ch to join – 18 sts.
Next Round: Repeat Round 2.
Next Round: Ch 3, [dc2tog, dc in next dc] 5 times, dc2tog, slip st to top of beginning ch to join – 12 sts.
Next Round: Repeat Round 2.
Next Round: Ch 3, [dc2tog] 5 times, dc in next dc, slip st to top of beginning ch to join – 7 sts. Fasten off.

Cut yarn, leaving a long tail. Thread tail through remaining sts and pull to close. Knot to secure.

FINISHING
With B, make pompom. Sew to tip of hat. Weave in ends. 

After I finished, I went to the row where A & B meet (where the band meets the actual hat) and I reconnected my band yarn. I did a row around of sc, sl and join. Then for the second row I did a basic wave type of stitch (not that you can see it well in the pictures, but I wanted it to have that “elf” look with the jagged edge). I did *sc, hdc, [dc picot dc in the same st] hdc, sc, sl st to previous sc row* and repeat around.
Then, I took a bit of green yarn and tied little jingle bells to the ends of the points (this also weighed them down so the little points didn’t stick straight up, lol). Then I used the fork method (if you’re not familiar with it, check out this great video http://www.youtube.com/watch?v=KRWmDcqVmPc) to make little bows out of shoestring ribbon. Instead of tying the bows behind the fork, I put the fork behind the bell and tied the ribbon around the bell and left the ends dangling. That’s it!
I think it came out really cute, and I’m THRILLED to have a hat that fits my big ole head, lol.
And don’t think I’ve forgotten about blogging my crafts. I started working on Christmas presents in September. So, aside from the few pieces that were ordered in during that time, I’ve been working since the fall on gifts. I don’t want to blog my family’s gifts, so I’ll have a few posts to share after Christmas.
Happy holidays everyone!  I’ll catch up with you in the new year!


And here I am in my new hat! Merry Christmas from ChiCK Crafts!


Monday, November 4, 2013

Little Cowboy Full Outfit


Once again, my mom has an employee who is having a baby. :-) This time, mom's friend requested a specific outfit. She had seen a picture of a pair of crocheted pants that looked like chaps. From what I could tell in the picture, I figured I could do one better. I purchased this pattern (http://www.ravelry.com/patterns/library/cowboy--cowgirl-accessories) from Carolyn Van Ostran on Ravelry. I did not use the exact pattern, but made some adjustments.

Her original pattern had the chaps tie in front, which I didn't love. I saw another version on pinterest that used a belt and belt loops, so I modified the purchased pattern to match. I also copied her styling and accents (I thought it was adorable) and added them to the pattern. Here is the version I found on pinterest (http://www.pinterest.com/pin/171207223308309878/) and here is what I did:


As you can see, I copied her styling pretty closely. The pattern I bought also included instructions for the vest, which I think came out realy cute (although I did not add the fringe or leave the attachment points for it). Mostly, I just needed the dimensions for both the chaps and the vest, and the pattern was pretty inexpensive.

To add the stars on the vest and chaps (also, there is one on the butt of the diaper cover that shows in between the chaps in the back) I modified this pattern (http://rubyandcustard.com/free-stuff/easy-crochet-star-pattern-and-tutorial/)

This is the above pattern with my changes marked
Round 1 – Make a ring using the magic ring technique, chain 2, make 9hdc into the ring. Pull the ring closed and slip into top of the 2 chain to create a complete circle. (10 stitches)
Round 2 – Join new color, chain 2, hdc into the first stitch. Chain 1, bobble stitch, and continue with chain 1, bobble stitch until last stitch. Slip into top of first stitch to join the circle. (20 stitches) I made one star using the bobble stitch, but I did not like the way it came out. So I instead did 2 HDC in place of each bobble. Also, I made them all one color.
Round 3 – this round is broken down into 5 sets of stitch groups each worked across 4 stitches.  Join new colour. (Sc, hdc) in first stitch,  (dc, trb, chain 2) in second stitch, (trb, dc) in third stitch, (hdc, sc) in  fourth stitch . This creates the first star point. Follow the same pattern across each set of four stitches to create 5 points.
  

I also wanted to make some little cowboy boots to go with the outfit, and I used this pattern (http://www.thecrochetcrowd.com/en/baby-crochet/623-baby-cowboy-booties-crochet-pattern.html) from The Crochet Crowd. I used the pattern as written, excluding row 5 (because I didn't like the boot heel) and I did not use her accenting. Instead I made a little star (which looks a little bit like a flower, but who is counting?) and put one on each boot. Overall, the pattern was easy to follow, and I'm happy with the results.

To make the little star flower thing, I used the same basic structure as the star above, but scaled down. In a magic circle, I did: ch 2, (sc, hdc, hdc, sc) x5, sl st to the beg ch, fasten off. Make sure to leave a long enough tail for sewing in later. I think next time I might do (sc, hdc, dc, hdc, sc) instead. But obviously I was okay enough with it to use them, lol. 


Hopefully I will get a picture of the little cowboy and I can add it to my blog and you can see it in action. :-)  Let me know if you have any questions about any of it.


Tuesday, October 29, 2013

Another Dinosaur Hat

So my adorable little niece (2 and a half) is in daycare at a church. Instead of having a Halloween party, they are throwing a Noah's Ark party.

Whatever.

So, my sister asked me to make her one of the dinosaur hats I've made in the past for the sweet kiddo. She wanted a girlie dinosaur hat instead of a "boy" one, lol, so here it is.

Dinosaur hat:

To make the actual hat, I once again used this earflap hat pattern from Micah Makes. http://www.micahmakes.com/blog/free-pattern-versatile-earflap-hat-pattern (sorry, blogger isn't really working with me right now, so I can't imbed the link. My bad, folks).

So, make the basic hat (I used the toddler size). I always add a couple of extra rows because I think the actual pattern is a little short. 

Stop before you add the earflaps.

My niece is almost 3 feet tall, and I wanted the hat to be pretty long on her. So, I made the long part in the back with dc instead of the hdc that is used throughout the rest of the pattern.

When you finish the final round, ch 2 then dc 35 around. Then we start the gradual decrease. You don't want it to dec too quickly because it will kill the length, so here is the dec pattern:
Row 1: ch 2, DC in next st and in next 34 across.
Row 2: ch 2, dc2tog then dc across.
Row 3: ch 2, DC across
Row 4: ch 2, DC across, for last two sts, dc2tog
Row 5: ch 2, DC across
Repeat.

If you're going it right, then each dec should be on the opposite side as the other dec, keeping the dec even throughout.

When it gets to about 8 sts across, do 2 rows of just DC across.
Last row: sc2tog, hdc, DC picot DC, hdc, sc2tog.
SC around entire piece to create a border, working 3 into each corner. Tie off and you're done with the basic hat and tail.


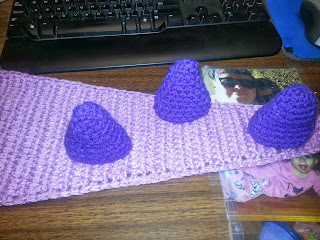
Next we're going to add the spikes, which make it an awesome dinosaur hat instead of just a weird beanie with a tail. At first I wanted to make all the spikes purple, but then I ran out of dark purple, so I decided to do half of them in pink. So, in this first pic, that's why all the spikes are purple.

To make a spike use this pattern that I found from: http://www.theboytrifecta.com/2011/01/dino-spike-crochet-pattern.html

She works in the round, which I don't. I prefer to work in rows. Your choice, either way.
Round 1: Make a magic loop/ring, and do 6 single crochets in the loop. Pull tight. (6 sc)
Round 2: Single crochet around (6 sc)
Round 3: 2 single crochet in first stitch, 1 sc in next stitch - repeat around (9 sc)
Round 4: Single crochet in each stitch (9 sc)
Round 5: 2 single crochet in first stitch, 1 sc in next stitch - repeat around (14 sc)
Round 6: Single crochet around (14 sc)
Round 7: Single crochet around (14 sc)
Round 8: Single crochet in 1st and 2nd stitches, 2 single crochet in third - repeat around  (18 sc)
Round 9: Single crochet around (18 sc)
Round 10: Single crochet around (18 sc)
Round 11: Single crochet around (18 sc)
 
Fasten off and leave a tail to sew spikes to hat (I wrapped the yarn around the base of the spike about 3 times and that was the amount I needed).


It took about 10 spikes to get the job done. The two closest to the face I made smaller by leaving off some of the last rows.  

 And there you have it!

I'll try to post pictures of little miss wearing it so you can get a better sense of what it is supposed to look like.


Friday, October 25, 2013

Halloween How To: Bloody Nails!

Oh Halloween! Definitely one of my favorite times of year. Down here in Texas the heat is finally starting to break, and everything is so fun and exciting! I kind of geek out a little bit, lol.

Anyway.

So today is a simple tutorial and not really a craft. I like doing my nails in ways that are VERY easy, but look cool. This is definitely one of those styles.

Dripping Blood Nail Job:

Paint nails white (I had to use about 3 coats to make a solid white color...I also buy the cheapie polish from the dollar store, lol).

Using a dot tool, add a dot of red (I lucked out and found a bottle of red china glaze at the bottom of my nail polish bowl) somewhere around the middle of the nail and drag upwards to the tip. After you've added one or two blood drips, paint the tip of the nail red. Doing this after the blood drips allows you to cover the ends of the drips and makes it look like the blood is dripping from the tips. Repeat x10. lol

Next I covered mine with glow in the dark nail polish (for the halloween parties, duh!) then a top coat.

I don't think they look too terrible. And they were VERY easy to do. I've gotten a ton of compliments on them, so that's good enough for me.

Happy Halloween!


P. S. I'll be back soonish with a new crochet tutorial. Check back sometime after November 1st.

Friday, August 16, 2013

More Crayons and a Bright Knight


While I was working on the first crayon blanket, I had a friend at work happen to see it. She told me she was hosting a baby shower in September, and wanted to know if I could make a crayon blanket for her gift to her friend. I was thrilled because I think the crayon pattern is just so damn cute.

This one I made on traditional crayon colors, unlike the last one which was fun pastels. I am in love with the way the standard colors came through. I think I might be making another one as a gift for a teacher friend...but we'll see. I hate making too many of a particular pattern one after the other.

To go with her blanket, my friend also asked if I could make her one of the knight helmets that I made for Happy Hats at work. She was a part of that event and loooooved the way the hate came out. She asked that it be made to match the blanket instead of in traditional colors (like grey to simulate armor). I was fine with that, and I think it came out adorable.
 Here is another pic with the visor up on the forehead. I didn't make this one with a button, and instead just sewed the visor on at the corner. I think it looks fine that way. Also, the little baby is going to outgrow it quickly, so I didn't think that the buttons made a ton of sense.

Had a lot of fun with this project. Both the blanket and the knight's helm are some of my favorite patterns, and I enjoy getting to make them for friends and little babies.

Friday, August 2, 2013

Crayons & Hippos and a pattern review


One of my mom's employees is having a baby, and she asked me to make a baby blanket to give to her. I had, just that day, stumbled across this pattern on pinterest, and I knew I *had* to make it for the new baby.

As you can see, I chose pastel colors instead of traditional basic crayon colors (although I have an order for another crayon blanket, which I very well may make in standard crayon colors...stay tuned for pics in September or October). I love the way this one came out. The crayons were simple to make, and I sewed them attachment style with 2 rows of sc around each piece. After it was finished I added another row of sc all the way around (doubling back on the bottom for a total of 3 sc rows along that edge). Otherwise, I used the pattern as written. No modifications.
US Instructions
Row 1: In red, ch 27, hdc in 3rd ch from hook, hdc in next 24 ch, turn. (25 sts)
Rows 2-8: Ch 2, hdc in each hdc, turn.
Change to Black.
Rows 9/10: Ch 2, hdc in each hdc, turn.
Change to Red.
Rows 11/12: Ch 2, hdc in each hdc, turn.
Change to Black.
Rows 13/14: Ch 2, hdc in each hdc, turn.
Change to Red.
Rows 15-30: Ch 2, hdc in each hdc, turn.
Row 31: Ch 2, hdc in next 9 hdc, hdc2tog, change to black, drop red, 2 hdc in next hdc, hdc in next hdc, 2 hdc in next hdc, change to red, drop black, hdc2tog, hdc in next 9 hdc, turn.
Row 32: Ch 2, hdc in next 8 hdc, hdc2tog, change to black, drop red, 2 hdc in next hdc, hdc in next 3 hdc, 2 hdc in next hdc, change to red, drop black, hdc2tog, hdc in next 8 hdc, turn.
Rows 33-58: Ch 2, hdc in next 9 hdc, change to black, drop red, hdc in next 7 hdc, change to red, drop black, hdc in next 9 hdc, turn.
Row 59: Ch 2, hdc in next 8 hdc, 2 hdc in next hdc, change to black, drop red, hdc2tog, hdc in next 3 hdc, hdc2tog, change to red, drop black, 2 hdc in next hdc, hdc in next 8 hdc, turn.
Row 60: Ch 2, hdc in next 9 hdc, 2 hdc in next hdc, change to black, drop red, hdc2tog, hdc in next hdc, hdc2tog, change to red, drop black, 2 hdc in next hdc, hdc in next 9 hdc, turn.
Rows 61-70: Ch 2, hdc in each hdc, turn.
Change to Black.
Rows 71/72: Ch 2, hdc in each hdc, turn.
Change to Red.
Rows 73/74: Ch 2, hdc in each hdc, turn.
Change to Black.
Rows 75/76: Ch 2, hdc in each hdc, turn.
Change to Red.
Rows 77-80: Ch 2, hdc in each hdc, turn.
Row 81: Ch 1, hdc2tog, hdc in next 21 hdc, hdc2tog, turn. (23 sts)
Row 82: Ch 2, hdc in each hdc, turn.
Row 83: Ch 1, hdc2tog, hdc in next 19 hdc, hdc2tog, turn. (21 sts)
Row 84: Ch 2, hdc in each hdc, turn.
Row 85: Ch 1, hdc2tog, hdc in next 17 hdc, hdc2tog, turn. (19 sts)
Row 86: Ch 2, hdc in each hdc, turn.
Row 87: Ch 1, hdc2tog, hdc in next 15 hdc, hdc2tog, turn. (17 sts)
Row 88: Ch 2, hdc in each hdc, turn.
Row 89: Ch 1, hdc2tog, hdc in next 13 hdc, hdc2tog, turn. (15 sts)
Row 90: Ch 2, hdc in each hdc, turn.
Row 91: Ch 1, hdc2tog, hdc in next 11 hdc, hdc2tog, turn. (13 sts)
Row 92: Ch 2, hdc in each hdc, turn.
Row 93: Ch 1, hdc2tog, hdc in next 9 hdc, hdc2tog, fasten off and sew in ends. (11 sts)
Work 2 Rows of sc in black evenly around the edge.
Make 5 more “crayons” in different colours and sew them together.

I had a little bit of yarn left over from the blanket, and I decided to make somethign else with the scraps. Sorry about the crop on his nose. But this is Happypotamus (as the pattern calls him). I actually purchased this pattern  from ravelry. It was only $6.50, and worth EVERY penny!! The instructions are marvelous, with pictures for every step. Not one thing about it is confusing. I highly recommend that if you're interested you purchase this one. I will say, though, that Mr. Happy came out HUGE! I was expecting maybe a 1 foot hippo. Using a "g" hook, this guy in the photo came out to a whopping 25" long, or just over 2 feet! I think he's a little big for a baby, lol. But hopefully mom likes him any way.

All in all, though, I couldn't be happier. The hippo came out great and matches the blanket very well. I think it is a successful gift :-)