Thursday, February 28, 2013

Spring yet?

Well, down here in Texas, Spring comes quite early. It has been chilly this week, but I think we're looking at the last cold push of the year. Which means what exactly?

Ever since my husband and I moved out of an apartment and into a house (back in August) I've been trying to do more gardening. I had some back porch planting going on in the apartment, but the upstairs neighbors would throw their trash down on my balcony, so anything on the porch usually go trashed or smushed. A couple of my plants survived (included a really neat Pony Tail Palm tree I got as a wedding gift from a friend). But now that we have a yard and lots of room to put stuff, I've been trying to plant more.

Of course, we're still renting, so everything has to be able to come with us if we decide to move. Plus we don't want to make any lasting changes to the house (like installing raised planting beds or anything).

So, where does that leave the point of this blog?

It is spring soon! Which means plants need to go "in the ground." However, I won't be putting them in the ground. I've been trying to think of how to plant/have raised beds without actually having rasied beds. After learning about how to grow potatoes in a tall structure, I saw a picture of a woman growing potatoes in a tall laundry basket and I had a Eureka! epiphany moment. I could use laundry baskets as small raised beds! I already have garlic (almost 100 heads) growing in window boxes on my porch. A trip to Wal-Mart last night led to the discovery of $2 and $3 laundry baskets. So, this weekend I plan on planting a BUNCH of goodies. Pics to come.


Today I will leave you with this. One of the things I want to try growing are sweet potatoes. I'm not that big on them, but my mom and my husband both want them, so I'm going to try. Everything I've read about sweet potatoes says to start them like Avocados. So, last night I cut two sweet potatoes in half, stuck toothpicks in them, and suspended them in water in vases (who says you'll never use all those damn centerpieces from your wedding?) and put them out on the porch. It is already pretty warm here (into the 60s during the day) so I don't think I need to keep them inside and warm. I'll try to update with how they progress through each stage. As of right now, I'm in day one hehe.

Obviously this is my first time trying to grow them, so it is going to be an adventure. Actually, this is my first attempt at growing veggies in general, so I'm pretty excited to get it going.

Sweet Potatoes Day One:
Please ignore my messy yard. My new puppies took everything off of my porch and drug it all over the yard. This weekend that will be getting cleaned up, lol.


This year I also planted some stalk-type flowers for the first time that are now starting to bloom.
The snapdragons came in first, and are really beautiful and all different colors. These pink/purple ones are my favorite though. You really can't tell in this picture, but they have yellow centers, so they are a stunning mix of purple and yellow.

This week my Larkspur also started blooming. They were just this weird grassy plant (you can see the grassy part at the bottom) and then a couple weeks ago these long shoots started growing. The zoomed up very quickly and started popping out these green buds (which you can see on the stalk on the left). Then a couple days ago, I went outside and there were these georgous purple little flowers popping out. I couldn't be happier.


Coming up I have some tulips, gladiator alliums, and bearded irises. I might also have some foxglove, but the put kept getting knocked over, and I'm not sure the plant has recovered enough to produce. We'll see.

Monday, February 18, 2013

In other news

I know that up to this point I have only blogged about crafts (does it count as "crafts" if I've only been blogging about crocheting? I don't know, lol). Today I have something else fun to talk about.

This weekend, my niece and I did a 5k called the Color Vibe. What is fun about this 5k is that when you register you get these packets of powdered color (dyed cornstarch) and throughout the race you get to throw them at people. There were also 5 stations set up throughout the race where volunteers would pelt you with this color, too. Sometimes it was in giant squirt bottles with the tops cut open, some would just throw handfuls at us, and some took an entire box of color and dumped it over our heads as we walked through the stations.

My niece is 11, and I thought this would be a wonderful first 5k for her. It was! She had a stinking blast, and as soon as we got into the car was already asking about the next 5k we could do together. So I'm thrilled that not only did I have a ton of fun, but I also got my niece excited about doing 5ks, too.


 After the actual 5k, they had a "party" at the finish line. They had a DJ, and were throwing prizes from the stage (like free t-shirts, running socks, and more color packets).


And finally, when we were leaving, my niece decided she wanted to take pictures lying on the ground at the starting line. Note...this ground used to be regular grey concrete. Not anymore. :-)


Thursday, February 14, 2013

On the horizon

Just so you don't think I'm off not working on anything, I wanted to give a heads up on what projects I'm currently working on. There are a couple, and I think they're going to be great.


Wrist warmers. I think these are going to be fun to make!


Monkey butt for my niece's new sister.


Blanket to be.

Thursday, February 7, 2013

Another blanket...kind of

I have been very excited about this project. I've been working on it for a couple of months off and on in my spare time. I finally finished sewing all the pieces together and adding the edging this week. 

This was my pinspiration for this piece. Which led to this very simple Lion Brand pattern. I love simple patterns. They are, by far, the best :)

This is my version of the pattern, and the one I worked off of. Each color was made into one large circle, 2 medium circles and 4 small circles. I did this for all 8 colors. Because this was a scrap blanket, not all of the colors exactly match the colors I had planned in my pattern.

If you saw my previous post about flower hat then you know I recommended the magic circle as a good way to start working rounds. I have to admit I'm a little new to using the magic circle, and was awestruck at how easy it was to learn and how beautiful it made my projects (I love not having that little hole).

This is how the start of my circles looked with the magic circle. Very tight and no ugly hole in the middle.

So, I used it to start all of my circles for this circles-to-squares project.

Except that, again, I used what was basically a metric ton of leftover yarn from other projects. Most of it being the cheapie red heart supersaver. Of course I tried my previous strategy of washing the project with fabric softener afterwards. This time it took three washes (on the gentle cycle of course) before the yarn became soft...which was not so good on my circles that I started with the magic circle.


Because this is how about half of the circles came out of the wash. :( :( :(

The magic circle blew out, leaving a ring of unattached stitches. I guess I'm going to have to use a needle and thread to tie these back into their original ring and repeat for each messed up piece. I'm pretty bummed about it.

Other than that, the scraps blanket has a kind of neat 70s retro feel (it definitely looks like something that would come out of the closet at my grandma' house)


These pictures are literally right out of the washing machine and onto the bed. The circles are all lumpy because they are still a touch damp (the hubs wasn't exactly thrilled that I layed the damp blanket out on our bed...oops haha).
So, all in all, it needs some work. I wouldn't call it a failed project yet. But it is definitely one I am frustrated with. I will post update pictures when I finish it and make it look much better, haha.

Wednesday, January 16, 2013

Another hat!

I know a month or so ago I promised to to show a project that combined the flower and the button...buuuuut I got distracted and forgot.

So, here is a simple project that I did that combined the flower accents and crochet buttons in a way that looks adorable!

I used this pattern for a slouchy hat in a simple black worsted yarn and made some minor adjustments to it. (my changes in a different color).

**

1. Ch 2. 10 DC in second ch from hook. Join with a sl st to the first dc.
I DC 10 in a magic circle. (If you're new to the magic circle/ring, the link to the left is a good video for explaining how to do it).
2. Ch 1. Work 2 dc in each stitch around. Join with a sl st to the first dc.(20 dc)

3. Ch 1. Work 2 dc in the first stitch. Work 1 dc in the next stitch. *Work 2 dc in the next stitch. Work 1 dc in the next stitch.* Repeat from * to * around. Join with a sl st to the first dc. (30)

4. Ch 1. Work 2 dc in the first stitch. Work 1 dc in each of the next 2 stitches. *Work 2 dc in the next stitch. Work 1 dc in each of the next 2 stitches.* Repeat from * to * around. Join with a sl st to the first dc. (40)

5. Ch 1. Work 2 dc in the first stitch. Work 1 dc in each of the next 3 stitches. *Work 2 dc in the next stitch. Work 1 dc in each of the next 3 stitches.* Repeat from * to * around. Join with a sl st to the first dc. (50)

6. Ch 1. Work 2 dc in the first stitch. Work 1 dc in each of the next 4 stitches. *Work 2 dc in the next stitch. Work 1 dc in each of the next 4 stitches.* Repeat from * to * around. Join with a sl st to the first dc. (60)

7. Ch 1. Work 2 dc in the first stitch. Work 1 dc in each of the next 5 stitches. *Work 2 dc in the next stitch. Work 1 dc in each of the next 5 stitches.* Repeat from * to * around. Join with a sl st to the first dc. (70)

8. Ch 1. Work 2 dc in the first stitch. Work 1 dc in each of the next 6 stitches. *Work 2 dc in the next stitch. Work 1 dc in each of the next 6 stitches.* Repeat from * to * around. Join with a sl st to the first dc. (80)

9. Ch 1. Work 1 dc in the first stitch and in each stitch around. Join with a sl st to the first dc. (80 dc)

10. Ch 1. Work 1 dc in the first stitch and in each stitch around. Join with a sl st to the first dc. (80 dc)

**if you want your hat slouchier, repeat Row 10 for each 1/2 inch in length you want it...then continue to Row 11**
I usually add two more rows here, meaning I have worked 12 rows before moving on to the next row.

11. Ch 1. *Work 1 dc in each of the next 6 stitches. DC2tog the next 2 stitches.* Repeat from * to * around. Join with a sl st to the first dc. (70)

12. Ch 1. *Work 1 dc in each of the next 5 stitches. DC2tog the next 2 stitches.* Repeat from * to * around. Join with a sl st to the first dc. (60)

13. Ch 1. *Work 1 dc in each of the next 8 stitches. DC2tog the next 2 stitches.* Repeat from * to * around. Join with a sl st to the first dc. (54)

14. Ch 1. Work 1 sc in each stitch around. (54 sc)

15. Ch 1. Work 1 sc in each stitch around. (54 sc)

16. Ch 1. Work 1 sc in each stitch around. (54 sc)

I have also found that a 3 row band makes the edge unstable, so I work 2 additional rounds of single crochets here, bringing the total to 5 rows of SC.

**

After making the hat, I crochet a button (see pattern above) in the same color as the hat, leaving a long tail onthe button for sewing later. I then crochet an accent flower in whatever color I choose (I actually have a whole box of these now to go with different outfits). I use the tail on the button to sew it to the band of the hat. Then, using the hole in the middle of the flower, I push the button through the flower, essentially buttoning the flower to the hat.

This means that whenever I feel like it, I can switch the flowers out because they're just bottoned on, not sewn on. I can also take the flower off, flip the hat inside out, and have just a plain black hat to wear.

Honestly, I LOVE this hat! I wear it all the time now (almost every day), and get a lot of requests to make them for other people.


So, as you can see, slouchy hat with white accent flower attached with crochet button!

More busy-ness

Business...busy-ness...get it?  :)
Anyway.

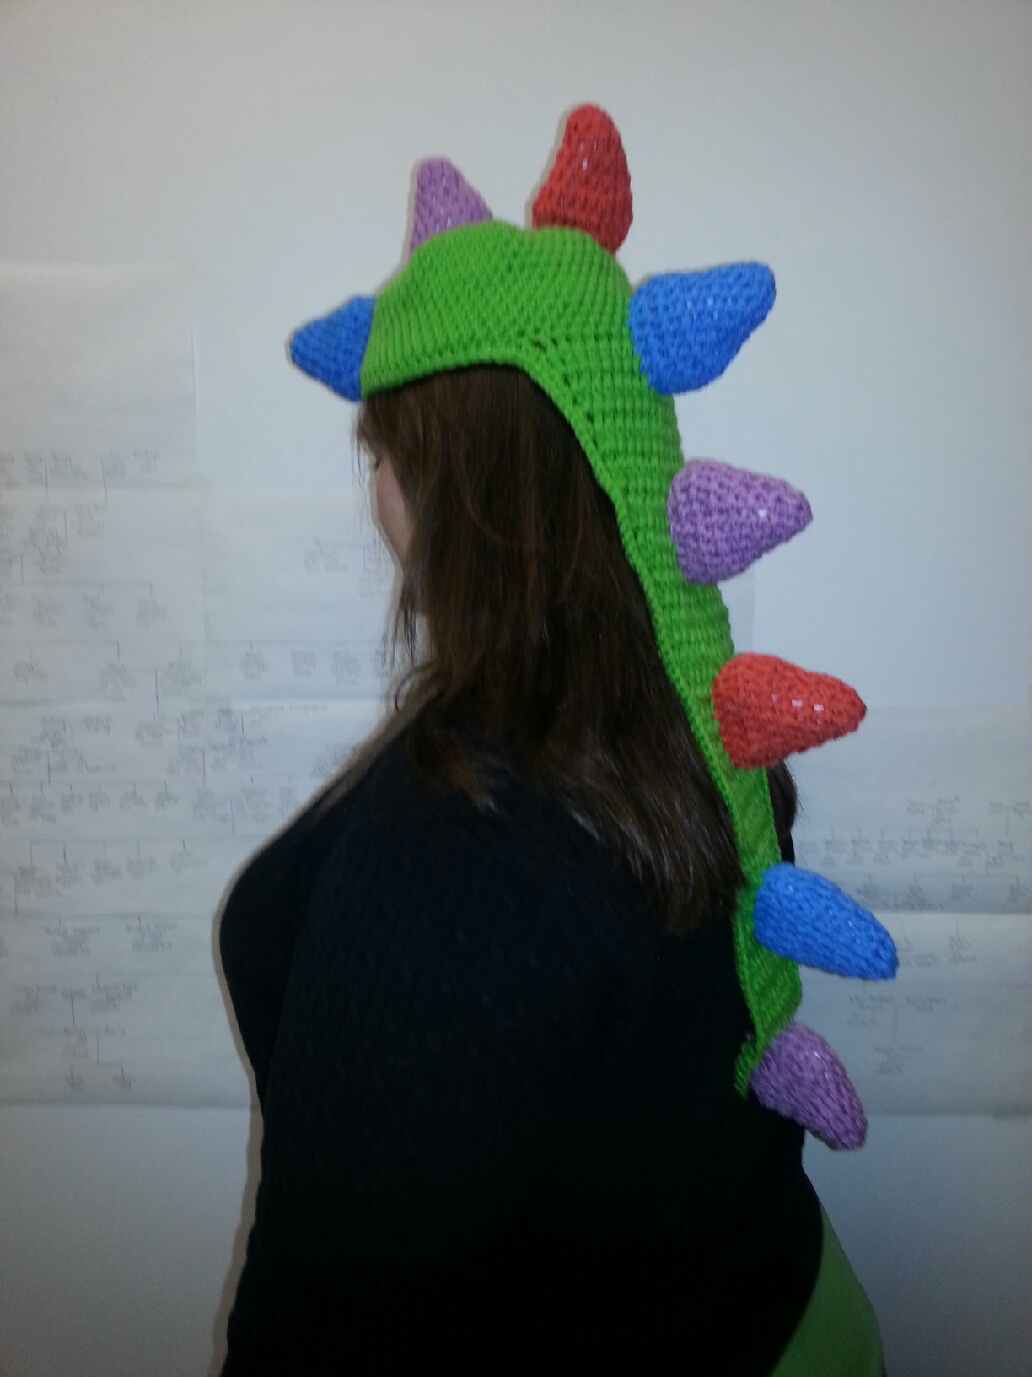
So, at work I am part of this group, and we do a lot of service work in the community. One of the projects we are working on right now is called Happy Hats. We are collecting hats to give to kids in the hospital. The hats are supposed to be whimsical, you know, to bring a little cheer to the sick kiddos.
Here are some of the hats I've been working on:


An owl! (haha you can see my pinspiration for this hat in the background...even though I didn't use her pattern, it did inspire me, so I felt it only fair to link back to her page)

I made my little sister try on all the hats...as payment for her puzzle blanket. I love having a model, lol.

A Dinosaur! RAWR! (again, my pinspiration)


Way cuter on Lil Sis

A Unicorn with a Rainbow Mane (this one was all me, lol)
Probably my favorite hat I've ever made

Hat with a Mohawk! (another one all mine)
Sadly, this one was too small to fit on sis's head. *sadface*

A cat "Scoodie" MEOW!
I'm a little mad because I put the paws on backwards, so I had to flip it inside out and reattach the ears...which lead to that ridge you see down the middle of Lil Sis's head. Oh well, there are always mess-ups with a new project.

 
Most of the hats are made with the same basic pattern (which I found here) (except for the scoodie, which is made from this pattern). I love earflap hats! So, I took this basic hat and added a little of my own creativity to make some really fun hats!
I might go through each of the hats and explain the little bits and pieces of how they came together, in case you might want to make your own.


UPDATE!
I added one more hat to my hats collection for Happy Hats. I'm totally in love with this one :)
My "pinspiration" (in quotes this time because it didn't come from pinterest...ish) this time came from a pin that led to an Etsy shop. I hate when I love an item, but the link leads to something to purchase. I want to make things...not buy them! So, I used her hat for a little bit of visual inspiration, but the actual hat design is all mine.
This is with the front visor up. See that black button on the side? It allows the visor to move.
And one with the front visor down so you can see what the visor looks like.
And from the side with the front visor down.


I think I need to stop making hats for a while, lol. 


Tuesday, January 15, 2013

So I've been busy...

I know it has been a while since my last post, but I've been busy getting some crafts together. The first was a project I was really excited about. I saw this post on pinterest (yeah yeah I know) that goes to this blog.

This led me to create this simple pattern.

I loved this woman's idea for a blanket of puzzle pieces, although I thought her execution was a little loose for my style of blanket. I like tightly stitched blankets that are thick. My mom also crochets like the blogger, nice and loose. I don't think there is anything wrong with it, it just isn't my style.

Here is my interpretation of her puzzle blanket:


All in all it was pretty easy to put together. It is just a different twist on a simple granny square. 
I made each granny square attachment style to the previous one to make each puzzle piece. Then I outlined each compelted piece with a single crochet in black, then sewed all the puzzle pieces together and added a simple black border with a scalloped edge.

These are pictures of the blanket in various states of done-ness. This gives you a better idea of how the granny squares go together, and shows the outlining of each piece before it was attached.


It is a gift for my sister, and she will be getting it this weekend when she comes in town. Lil Sis said she wanted the blanket in primary colors. I didn't think it would come out nice in those colors...but obviously I was wrong. I love the way it came out.

I have to admit, I used the cheapie yarn (Red Heart Super Saver) because it was on sale. lol. I took some pinterest advice and washed the thing in fabric softener when I was finished with the whole blanket. I tried washing it with the just the FS, but it didn't really work. So, I washed it again with FS and a little bit of liquid detergent. After a short wash, I put it in the dryer on delicate or low heat for about an hour. It is one of the softest blankets I have ever touched. It is just as soft as blankets I have made with expensive yarns. I'm extremely happy that a little bottle of FS could save me so much money and make this project sooooooo soft.


In other news, a friend and I have opened our own Etsy shop (again, yeah yeah I know). You can see (or purchase) crafts we/I have been working on. The link should be (shortly) posted on the side bar of the main page of my blog, so feel free to check it out!